If you own a Toronto, Mississauga, Vaughan or Markham home with a dormer, you already know they are one of the most charming features on a roofline, adding headroom, light and curb appeal to upper-floor bedrooms. Unfortunately, they are also one of the most common sources of water intrusion, which is why dormer roof leak repair ranks among the most frequent calls we field across the GTA each summer. A dormer creates extra valleys, sidewalls and intersections where the main roof plane meets the projecting structure, and every one of those junctions depends on flashing that must be installed and maintained correctly. When that flashing fails, water finds its way behind the cladding, soaks the sheathing and shows up as a stain on a bedroom ceiling months before anyone connects it to the dormer above.
This guide explains exactly why dormers leak, how summer thunderstorms and wind-driven rain expose weak flashing, what a proper repair involves, and what 2026 costs look like across the Greater Toronto Area. As The Roof Technician, we have repaired hundreds of dormers on century homes in the Annex and Leslieville as well as newer builds in Vaughan and Markham, and the patterns are remarkably consistent. Knowing the warning signs early can save you thousands in interior repairs.

Why Dormer Roof Leak Repair Is So Common in Toronto
A dormer is essentially a small roofed structure that pokes through the main roof slope, and that intersection is where trouble starts. The reason dormer roof leak repair is so common across Toronto and the GTA comes down to geometry: every dormer multiplies the number of transition points on your roof. Where a simple gable roof might have two or three vulnerable areas, a roof with two dormers can easily have a dozen flashing junctions, each one a potential leak path if the metal is short, corroded, improperly lapped or relying on caulking instead of a true mechanical overlap.
Toronto’s older neighbourhoods compound the problem. Many century and post-war homes have original or near-original flashing that has been painted over, patched with roofing tar, or buried under a second layer of shingles. Tar and sealant become brittle and crack within five to eight years in our freeze-thaw climate, and once the seal opens, summer downpours drive water straight into the wall cavity. Newer subdivisions in Vaughan and Markham are not immune either; rushed builder installations frequently skip step flashing in favour of a single bent piece of metal, which traps water rather than shedding it.
Summer is actually prime season for discovering dormer leaks. Intense GTA thunderstorms produce heavy, wind-driven rain that hits the vertical sidewalls of a dormer at an angle no roof was designed to shrug off without proper sidewall and head flashing. Water that would run harmlessly off a sloped surface instead gets pushed sideways and upward under shingles and behind cladding. If your ceiling stain appears or grows after a summer storm rather than a winter thaw, the dormer flashing is the prime suspect.
The Anatomy of a Dormer: Where Leaks Actually Start
To fix a leak you have to understand the parts. A dormer has several distinct flashing zones, and a leak almost always traces back to one of them failing. Understanding the anatomy helps homeowners describe the problem accurately and helps our crews price an accurate repair instead of a guess.
| Flashing Zone | What It Protects | Common Failure | Leak Severity |
|---|---|---|---|
| Head flashing (apron) | Top of dormer where it meets main roof | Short metal, reverse lap, tar patch | High |
| Step flashing (sidewalls) | Vertical dormer walls against shingles | Continuous strip instead of stepped pieces | High |
| Valley flashing | Where dormer roof meets main slope | Debris dams, corrosion, undersized metal | Severe |
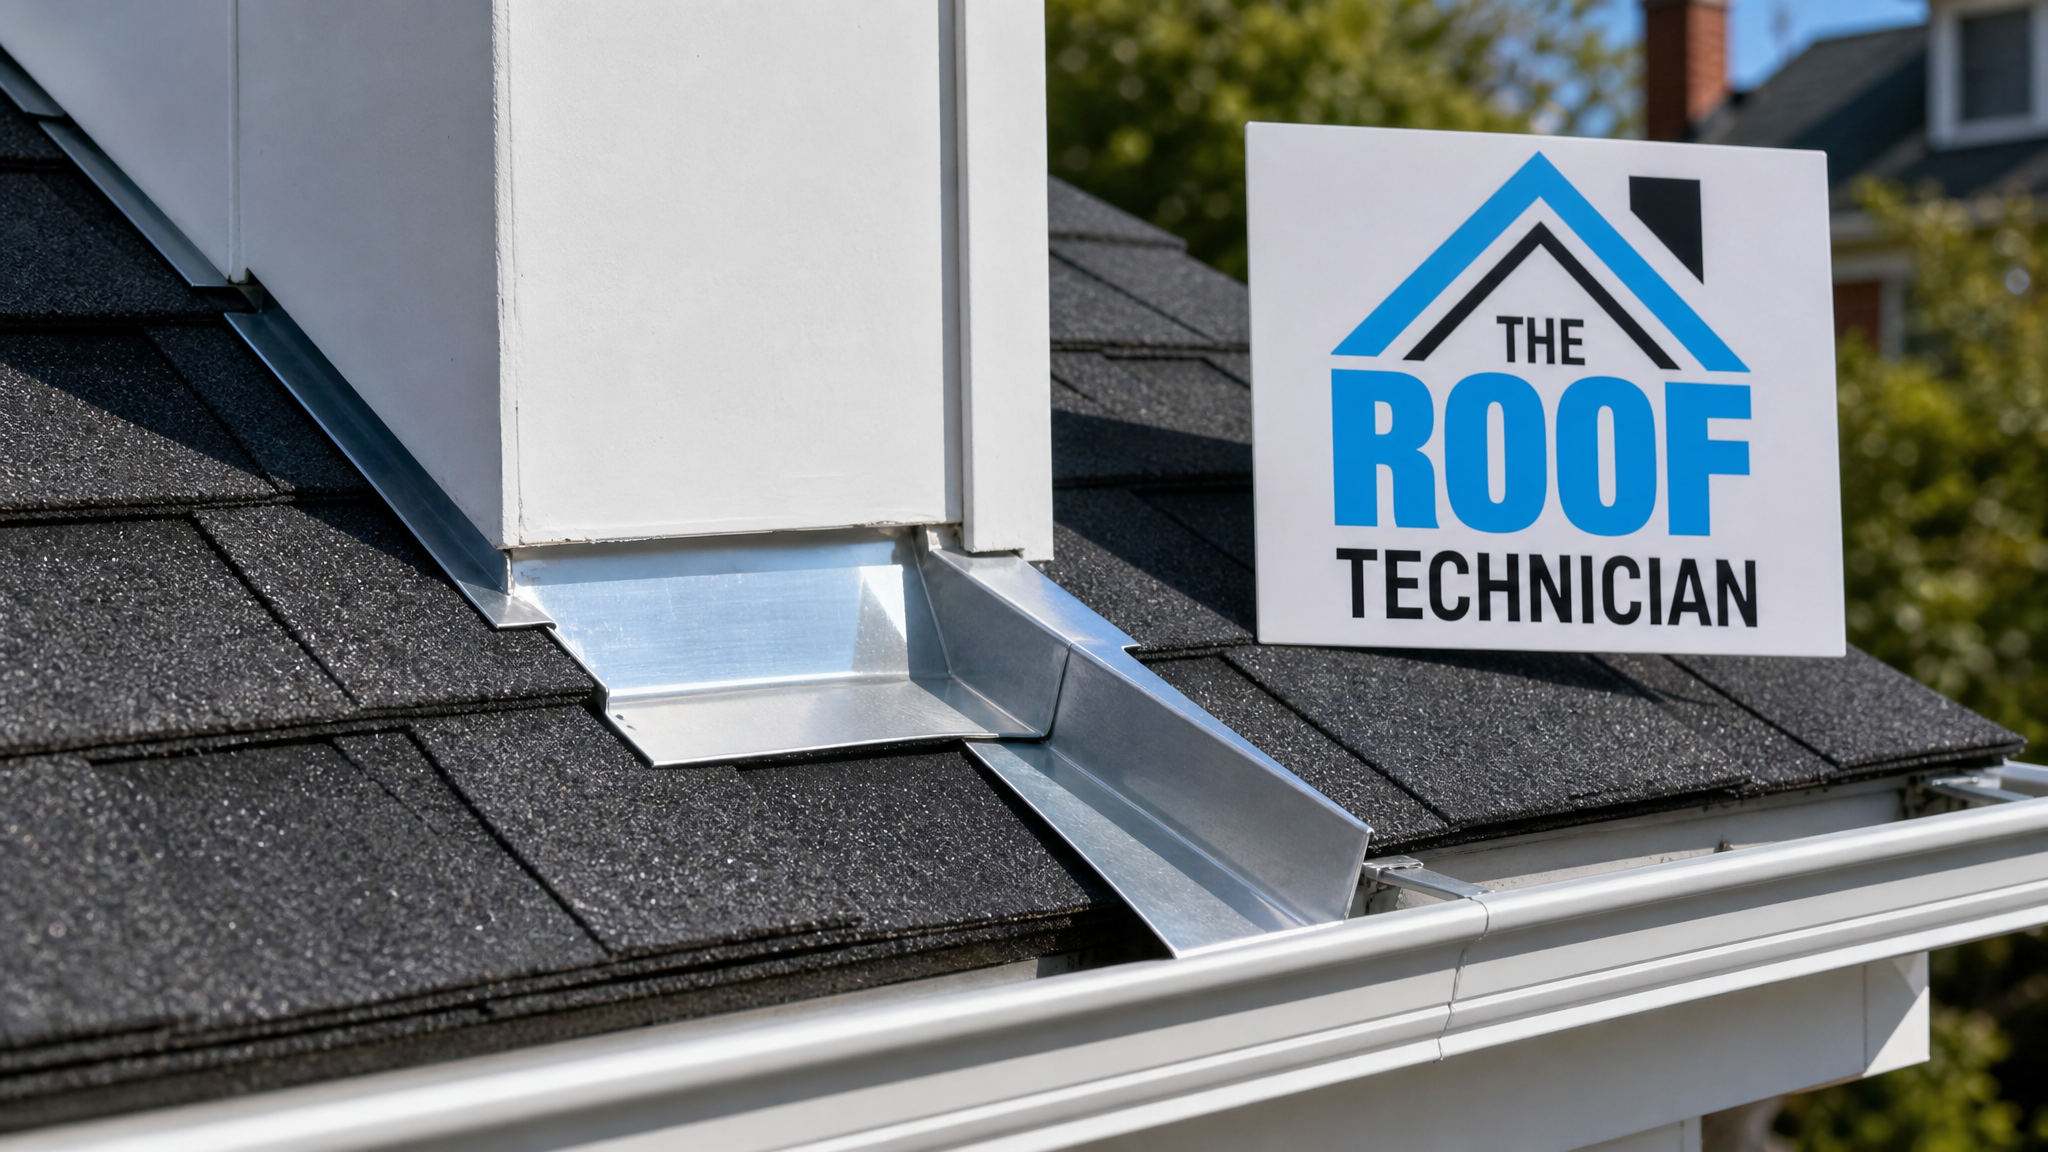
| Kick-out flashing | Base where sidewall meets eave | Missing entirely (most common) | Severe |
| Cladding/siding seams | Dormer face and corners | Failed caulking, gaps at trim | Moderate |
The single most overlooked component is kick-out flashing, the small diverter at the bottom of a dormer sidewall that throws water into the gutter instead of behind the siding. Builders skip it constantly. Without it, every storm funnels water directly into the wall, rotting sheathing and framing invisibly for years. Many of the worst rot cases we encounter during a roof repair in Toronto trace back to a single missing piece of kick-out metal that would have cost a few dollars to install correctly.
Warning Signs You Need Dormer Roof Leak Repair
Dormer leaks are sneaky because the water entry point is rarely above the stain. Water travels along rafters and sheathing before dripping, so a stain in the centre of a bedroom may originate from a dormer two metres away. Watch for these indicators, especially after a heavy summer rain.
| Warning Sign | Likely Cause | Urgency |
|---|---|---|
| Brown ring on upper-floor ceiling | Head or valley flashing leak | Schedule inspection within weeks |
| Peeling paint on dormer interior wall | Sidewall step flashing failure | Schedule inspection promptly |
| Soft or stained exterior trim at dormer base | Missing kick-out flashing | Urgent, rot likely |
| Musty smell in dormer bedroom | Hidden moisture in wall cavity | Urgent |
| Granules in gutter below dormer valley | Worn shingles at valley | Monitor, plan repair |
| Daylight visible from attic at dormer | Gap in sheathing or flashing | Urgent |
If you can safely access your attic, inspect the underside of the roof deck around the dormer after a storm. Dark water tracks, damp insulation or rusty nail tips all confirm active intrusion. Proper attic ventilation matters here too, because a poorly ventilated attic traps the humidity from a slow leak and accelerates mould growth and sheathing decay. Catching the problem at the granules-in-gutter stage is far cheaper than waiting for the ceiling-stain stage.
How a Proper Dormer Flashing Repair Is Done
A lasting fix never relies on a tube of caulking smeared over a gap. Proper dormer flashing repair is a mechanical system where overlapping pieces of metal shed water by gravity, with sealant playing only a secondary, backup role. Here is how our crews approach it on a typical GTA home.
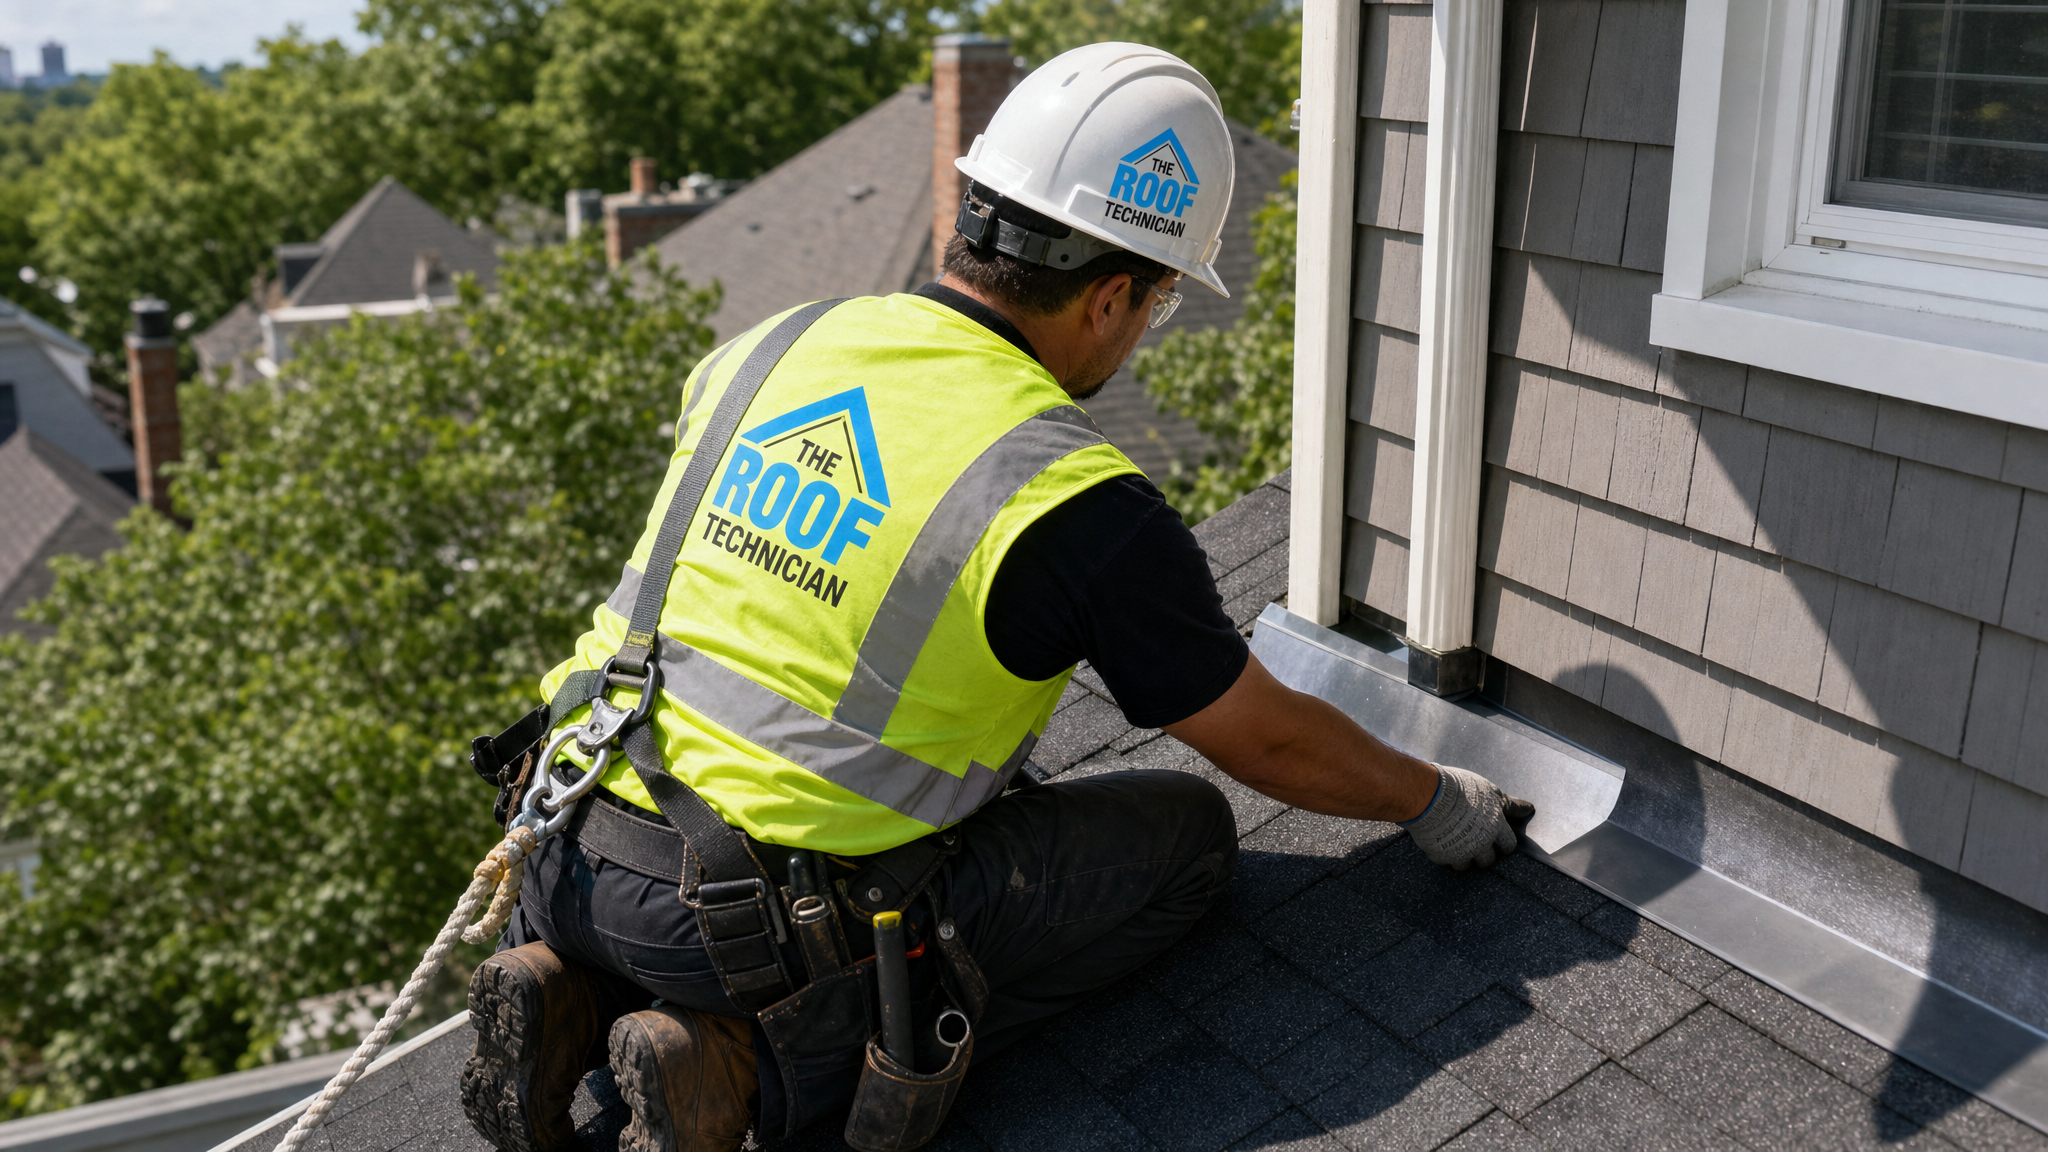
First, we remove the shingles and cladding immediately adjacent to the dormer to expose the existing flashing and the condition of the sheathing underneath. This is the moment of truth: if the deck is soft or rotted, it must be cut out and replaced before any new metal goes on. Skipping this step is why so many quick patches fail within a year. Next, we install self-adhered ice-and-water membrane up the sidewalls and across the head, creating a waterproof underlayment that protects against any water that gets past the metal.
The flashing itself is rebuilt in the correct sequence. Step flashing goes in as individual pieces, one per shingle course, each bent over the dormer wall and lapped by the piece above so water always flows onto the next shingle, never behind it. Head flashing (the apron) is installed under the course above and over the shingles below. Critically, kick-out flashing is added at the base of each sidewall to divert water into the gutter. Finally, the cladding and shingles are reinstalled to lap over the new metal. The result is a layered system that will outlast the shingles themselves. For homeowners weighing a repair against a full roof replacement, isolated dormer work is usually a targeted, cost-effective fix when the rest of the roof is sound.
2026 Dormer Roof Leak Repair Costs Across the GTA
Cost depends heavily on what the crew finds once the flashing is opened up. A clean reflash with no rot is straightforward; a repair that uncovers rotted sheathing, damaged framing or interior drywall damage climbs quickly. The figures below reflect 2026 pricing across Toronto, Mississauga, Vaughan and Markham, including labour, materials and disposal.
| Repair Scope | Typical 2026 Cost (CAD) | Timeframe | Notes |
|---|---|---|---|
| Minor reseal / single flashing piece | $450 – $850 | Half day | Temporary if metal is old |
| Full sidewall step flashing reflash | $1,100 – $2,200 | 1 day | Includes kick-out flashing |
| Head + valley flashing rebuild | $1,800 – $3,400 | 1 – 2 days | Membrane underlayment included |
| Reflash + sheathing replacement | $2,800 – $5,200 | 2 – 3 days | Rot found under flashing |
| Full dormer rebuild (framing + cladding) | $6,500 – $14,000+ | 4 – 7 days | Severe structural rot |
Two factors push costs higher in our market. The first is access: a third-storey dormer or a steep slope requires more staging and fall-protection setup, adding labour. The second is interior damage; if the leak has stained ceilings or grown mould inside the wall, drywall and finishing work add to the roofing invoice. This is the strongest argument for early action. A $700 reflash today is far cheaper than a $5,000 sheathing-and-drywall project after two more summers of intrusion. You can read about real GTA homeowners’ experiences on our customer reviews page.
Dormer Repair Versus Roof Replacement: Making the Call
Not every dormer leak means a new roof, and not every dormer can be saved with a patch. The right decision depends on the age of your shingles, the extent of the rot and how many dormers are involved. If your shingles are under twelve years old and the leak is isolated to one dormer’s flashing, a targeted reflash is almost always the smart choice. If your roof is twenty years old, curling and shedding granules, and two or more dormers are leaking, folding the dormer work into a full replacement avoids paying twice for staging and tear-off.
Material choice also matters at dormers. Asphalt shingles dominate GTA roofs and handle dormers well when flashed correctly, but low-slope dormer tops sometimes call for a membrane system better suited to flat sections; in those cases our flat roofing approach may apply to the dormer’s top plane. Dormers that incorporate skylights add another flashing interface that must be integrated into the same waterproof layer, which is why these features should always be tackled together rather than piecemeal. We serve homeowners throughout the region; you can confirm coverage for your area in Vaughan, Markham and Mississauga on our service pages.
Preventing the Next Dormer Leak
Once a dormer is properly reflashed, keeping it watertight is mostly about maintenance. Clear debris from dormer valleys at least twice a year, as leaves and needles form dams that force water sideways under shingles. Keep gutters and downspouts below dormers flowing freely so kick-out flashing can do its job. Inspect exterior caulking at trim and corners each summer and reapply before it cracks fully open.
An annual professional inspection is the cheapest insurance available. A trained eye spots a lifting shingle, a hairline gap in a head flashing or early granule loss long before water reaches your ceiling. Homeowners who book a yearly check almost never face the catastrophic rot repairs that surprise those who wait for visible stains. You can find answers to common maintenance questions on our FAQ page, and confirm we cover your municipality on our service areas page.
| Maintenance Task | Frequency | DIY or Pro | Why It Matters |
|---|---|---|---|
| Clear dormer valley debris | Twice yearly | DIY (if safe) | Prevents water damming |
| Flush gutters below dormers | Twice yearly | DIY (if safe) | Keeps kick-out flashing effective |
| Inspect and renew caulking | Annually | DIY or Pro | Stops wind-driven rain entry |
| Professional flashing inspection | Annually | Pro | Catches failures early |
| Attic moisture check | After major storms | DIY | Confirms no active leak |
How do I know if my dormer roof leak repair is urgent?
Why does my dormer leak only during summer storms?
Can dormer flashing be fixed with caulking alone?
What is kick-out flashing and why does it matter?
How much does dormer roof leak repair cost in Toronto in 2026?
Should I repair the dormer or replace my whole roof?
Book Expert Dormer Roof Leak Repair Today
A leaking dormer will not heal itself, and every summer storm pushes more water into your sheathing and walls. The good news is that professional dormer roof leak repair is a targeted, affordable fix when caught early, restoring your roofline to fully watertight condition with properly layered, mechanically lapped flashing built to outlast your shingles. The Roof Technician brings decades of GTA experience to every dormer, from century homes downtown to new builds in the suburbs, and we stand behind our flashing work.
Call us today at (416) 826-0040 or schedule a free roof inspection to stop the leak before it becomes a structural problem.
The Roof Technician proudly serves homeowners across Toronto, Mississauga, Vaughan, Markham and the GTA with expert dormer flashing, repairs and roof replacements.