Chimney flashing is the system of metal pieces and sealants that creates a watertight seal between your chimney and your roof surface — and it is one of the most common sources of roof leaks in Toronto homes. Because a chimney penetrates the roof at a point where two fundamentally different materials meet (brick masonry and asphalt shingles), the junction between them must accommodate the different expansion and contraction rates of each material while remaining completely watertight through decades of Toronto’s punishing freeze-thaw cycles, wind-driven rain, and ice loading. When chimney flashing repair toronto homeowners need is delayed or done improperly, the result is persistent water infiltration that damages rafters, insulation, drywall, and even the chimney structure itself.
Why Chimney Flashing Fails: Understanding the Root Causes of Chimney Flashing Repair Toronto Homes Require
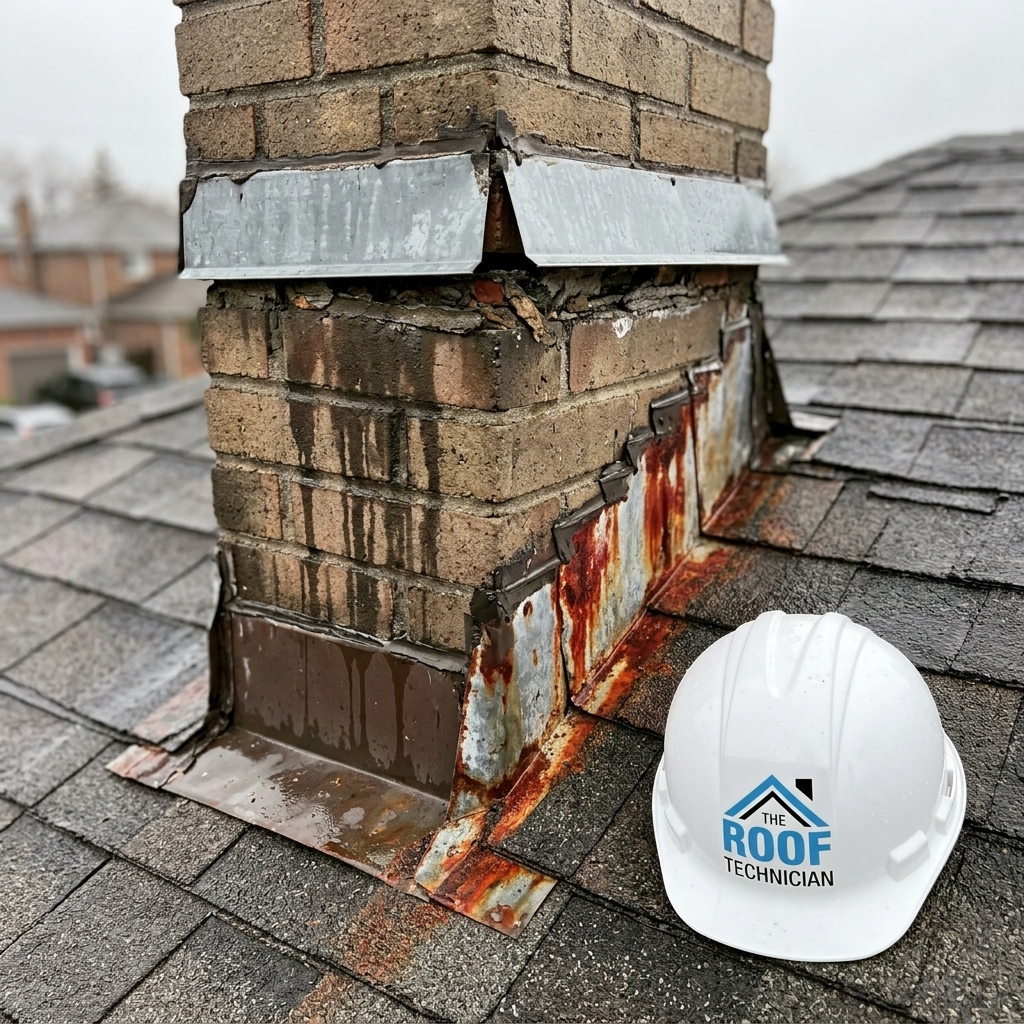
Chimney flashing does not fail because of a single event — it fails gradually through a combination of material degradation, thermal cycling, and mortar deterioration that eventually overwhelms the system’s ability to keep water out. Understanding the specific failure mechanisms helps homeowners recognize the warning signs early, before a small flashing problem becomes a major water damage emergency.
| Failure Mechanism | What Happens | Signs You Will See | Typical Timeline |
|---|---|---|---|
| Sealant deterioration | Roofing cement and urethane sealants dry out, crack, and separate from surfaces due to UV exposure and thermal cycling | Visible gaps between flashing and chimney, dried/cracked sealant visible from ground level | 5-10 years |
| Mortar joint erosion | The mortar joints where counter-flashing is embedded erode from freeze-thaw cycling, loosening the flashing | Counter-flashing pulling away from the chimney, loose flashing edges lifting in wind | 10-20 years |
| Galvanic corrosion | Contact between dissimilar metals (aluminum flashing against steel nails, copper against aluminum) causes accelerated corrosion | Rust stains running down the roof or chimney, pinholes in flashing metal | 8-15 years |
| Improper original installation | Flashing installed with sealant only (no mechanical fastening), incorrect overlap, or using a single piece instead of stepped sections | Leaks that appear within the first 5 years after a roof replacement, or flashing that does not follow the stair-step pattern of the shingles | Immediate to 5 years |
| Missing cricket (diverter) | Chimneys wider than 30 inches without a cricket allow water and debris to pool behind the chimney, accelerating deterioration | Debris accumulation behind the chimney, staining on the rear chimney wall, leaks during heavy rain | Ongoing |
The Anatomy of Proper Chimney Flashing
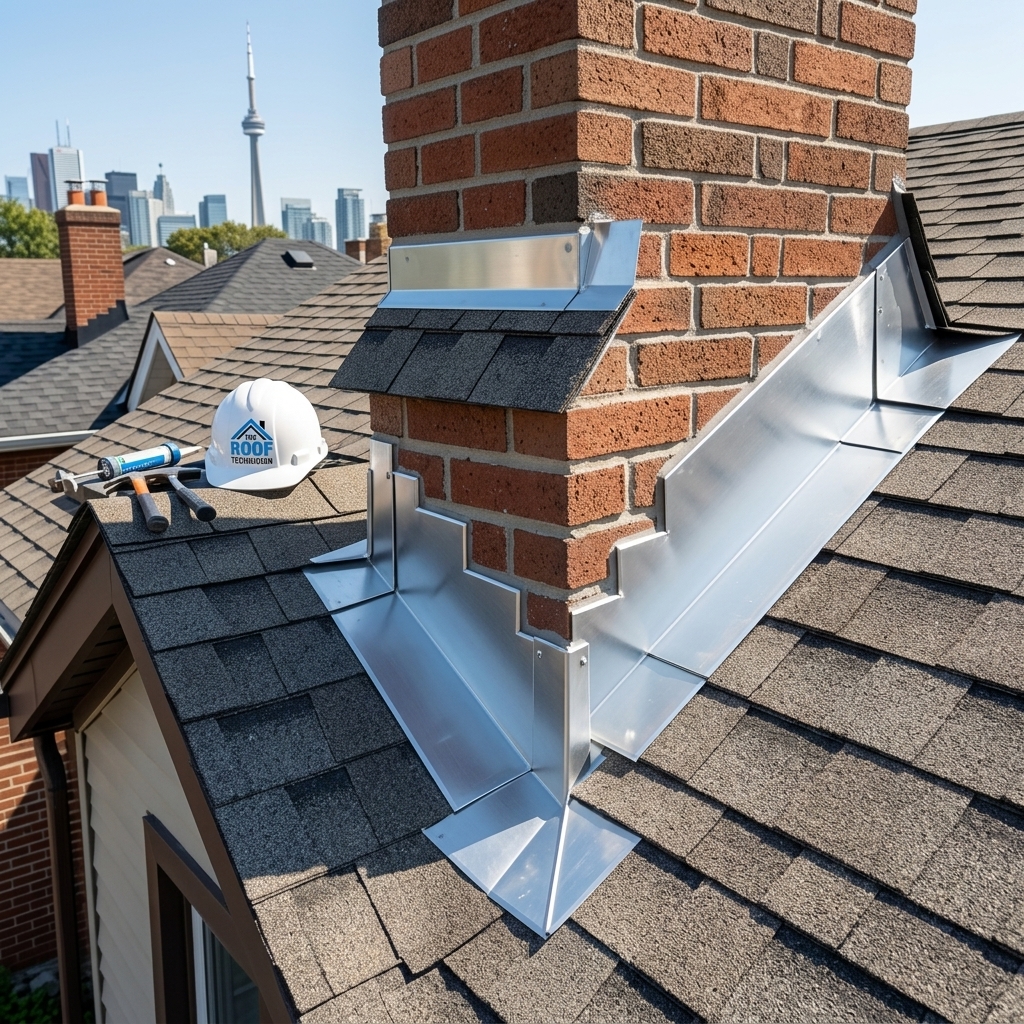
Professional chimney flashing is a multi-component system — not a single piece of metal. Each component serves a specific function, and all must work together to create a durable, watertight seal. Understanding these components helps you evaluate whether your current flashing was installed correctly and whether a repair or full replacement is the right approach.
Step Flashing
Step flashing consists of individual L-shaped pieces of metal (typically aluminum or galvanized steel) installed in a stair-step pattern alongside the chimney, with each piece overlapping the one below it and woven between successive courses of shingles. This stepped design ensures that water flowing down the roof is redirected away from the chimney at every shingle course, rather than channelling along the chimney wall where it could find a path inside. Each step flashing piece should be a minimum of 4 inches wide on each leg of the L-shape, with a minimum 2-inch overlap between pieces.
Counter-Flashing
Counter-flashing is a second layer of metal that covers the top edge of the step flashing and is embedded into the chimney’s mortar joints (or a reglet cut into the brick). Counter-flashing prevents water from running behind the step flashing and is the component most commonly responsible for leaks when it fails — because mortar joints deteriorate over time, loosening the counter-flashing and allowing wind-driven rain to penetrate behind it. Proper counter-flashing is installed by cutting a groove (reglet) into the mortar joint, inserting the flashing, and sealing with high-quality polyurethane sealant.

The Cricket (Saddle Diverter)
A cricket — also called a saddle — is a small peaked structure built on the upslope side of a chimney to divert water and debris around the chimney rather than allowing it to pool behind it. Ontario Building Code requires a cricket on any chimney wider than 30 inches (measured perpendicular to the roof slope). Even on narrower chimneys, a cricket is a best practice that prevents debris accumulation, reduces ice buildup, and significantly extends the life of the rear chimney flashing. A properly built cricket has its own metal flashing that integrates seamlessly with the chimney step flashing and the surrounding roof shingles.
Chimney Flashing Repair vs. Full Replacement
| Scenario | Recommended Action | Cost Range | Expected Lifespan |
|---|---|---|---|
| Sealant has dried and cracked but metal is intact and properly positioned | Repair — remove old sealant, clean surfaces, apply new polyurethane sealant | $200 – $500 | 5-8 years before next reseal |
| Counter-flashing has pulled away from mortar joints | Repair — reset counter-flashing in new reglet cuts with fresh mortar and sealant | $400 – $800 | 10-15 years |
| Step flashing is corroded, bent, or improperly installed | Full replacement — remove shingles adjacent to chimney, install new step flashing, counter-flashing, and cricket | $800 – $2,500 | 20-30 years (life of roof) |
| Active water damage visible inside the home near the chimney | Emergency repair + full replacement — temporary waterproofing followed by complete flashing system replacement | $1,000 – $3,000 | 20-30 years |
| Roof replacement in progress | Always replace all chimney flashing during a roof replacement — reusing old flashing is a false economy | Included in quality roof replacements | Life of new roof |
The Repair Process: What to Expect
A professional chimney flashing replacement by The Roof Technician follows a systematic process that addresses every component of the flashing system. First, the existing flashing, sealant, and adjacent shingles are carefully removed to expose the roof deck and chimney surfaces. The roof deck is inspected for water damage — any soft, delaminated, or rotted sheathing is replaced before new flashing is installed. Ice and water shield membrane is applied around the entire chimney perimeter, extending a minimum of 12 inches onto the roof deck in every direction.
New step flashing is then installed piece by piece, woven into each course of replacement shingles. Counter-flashing is cut from a single continuous piece of pre-bent aluminum, inserted into freshly cut reglet grooves in the mortar joints, and sealed with high-quality polyurethane sealant. If the chimney is wider than 30 inches, a new cricket is framed, sheathed, and flashed with integrated metal that ties into the step flashing system. Finally, all joints and edges receive a final sealant application, and the surrounding shingles are replaced and sealed to restore the continuous roof surface. The entire process takes 4 to 8 hours depending on chimney size and complexity.
Choosing the Right Flashing Material
The material choice for chimney flashing significantly affects longevity, cost, and performance. Aluminum is the most commonly used material for residential chimney flashing in the GTA — it is lightweight, corrosion-resistant, easy to form to complex shapes, and costs $3 to $6 per linear foot. Galvanized steel is stronger and more rigid, making it suitable for areas with high wind exposure, but it will eventually rust if the zinc coating is compromised — particularly at cut edges and bends. Copper is the premium choice — virtually corrosion-proof with a lifespan exceeding 50 years — but costs $8 to $15 per linear foot and develops a distinctive green patina over time that may not suit every home’s aesthetic. Lead-coated copper offers similar durability without the colour change but at an even higher price point, making it primarily a heritage and luxury home material.
Regardless of the material selected, the most critical factor in flashing longevity is the quality of installation — specifically, proper mechanical fastening, adequate overlap between components, correct integration with the shingle system, and the use of high-quality polyurethane sealants rather than inexpensive roofing cement that degrades within a few years. A well-installed aluminum flashing system will outperform a poorly installed copper system every time, because the failure point is almost always the installation methodology, not the metal itself.
Seasonal Timing for Chimney Flashing Work
The optimal window for chimney flashing repair or replacement in Toronto is May through October, when temperatures are consistently above 10 degrees Celsius and shingle adhesive strips can properly bond. Emergency flashing repairs can be performed in winter, but the sealants and adhesives used in cold weather applications are less durable than warm-weather products, and working on a snow-covered or icy roof introduces significant safety risks that increase labour costs. If you identify flashing problems during a winter roof inspection, temporary waterproofing can be applied as an emergency measure with a permanent repair scheduled for the following spring. Planning ahead by scheduling a fall inspection before November ensures any flashing issues are addressed before winter weather compounds the damage.
Warning Signs That Your Chimney Flashing Needs Attention
- Water stains on the ceiling or walls near your chimney — the most obvious sign of flashing failure, typically appearing during or after heavy rain or snowmelt
- Musty smell in the attic near the chimney — indicates moisture infiltration and potential mould growth on the underside of the roof deck
- Visible rust stains running down the chimney or roof surface — indicates corroding flashing metal that is losing its protective coating
- Flashing edges lifting or visible gaps between flashing and chimney — wind can drive rain directly into these openings
- Efflorescence (white salt deposits) on chimney bricks near the roofline — indicates water migrating through the masonry, often due to failed flashing allowing water behind the counter-flashing
- Mortar deterioration at the roofline — eroded mortar joints where counter-flashing is embedded compromise the entire flashing system
How much does chimney flashing repair cost in Toronto?
How long does chimney flashing last?
Should chimney flashing be replaced during a roof replacement?
Can I repair chimney flashing myself with roofing cement?
What is a chimney cricket and do I need one?
Why does my roof leak only when it rains heavily or when snow melts?
Fix Your Chimney Flashing Right — Call The Roof Technician
Chimney flashing leaks do not get better on their own — they get worse with every rain, every freeze-thaw cycle, and every winter storm. Our team diagnoses the exact failure point, provides transparent pricing for repair or replacement, and executes the work to a standard that eliminates leaks permanently. Every chimney flashing project includes ice and water shield membrane, premium polyurethane sealants, and a workmanship warranty that gives you lasting peace of mind.
Call us today at (416) 826-0040 or request your free chimney flashing assessment online.
The Roof Technician provides expert chimney flashing repair and replacement across Toronto, Mississauga, Brampton, Oakville, Burlington, Vaughan, Markham, and the entire GTA. We stop leaks at the source — permanently.